> ## Documentation Index
> Fetch the complete documentation index at: https://ubicloud-00f14c0d-dependabot-github-actions-actions-checkou-0.mintlify.site/llms.txt
> Use this file to discover all available pages before exploring further.
# Command Line Interface
> Ubicloud provides a command line interface named `ubi`, which allows you to interact with Ubicloud directly from the command line.
This guide shows you how to download, setup, and use the `ubi` command line program.
### Download
You can download the latest release of `ubi` from [the ubicloud/cli releases page on GitHub](https://github.com/ubicloud/cli/releases). We offer downloads of `ubi` for the following operating systems and platforms:
* Linux: amd64/x86\_64/x64, 386/x86, arm64/aarch64
* macOS/Darwin: arm64(Apple silicon), amd64(Intel)
* Windows: amd64/x86\_64/x64, arm64
The Linux/macOS/Windows downloads are tar.gz or zip files, each containing a single-file executable named `ubi`, which can be run directly without installation.
If you are a MacOS user, you can also install with homebrew by running:
```
brew install ubicloud/cli/ubi
```
As `ubi` is part of Ubicloud, it is open source, and [available for review](https://github.com/ubicloud/ubicloud/blob/main/cli/ubi.go). It is a small program is written in [Go](https://go.dev), and if we do not already provide builds for your platform, you can build `ubi` yourself using the Source Code download on the GitHub release page. You can also contact us at [support@ubicloud.com](mailto:support@ubicloud.com) and ask us to provide builds for your operating system and platform.
`ubi` does not automatically update itself. It is a simple program that transmits your command to Ubicloud. As Ubicloud adds support for additional command line capabilities, `ubi` can automatically take advantage of them. However, there may potentially be cases where you need a newer version of `ubi` to take advantage of the additional command line capabilities. In that case, please download the newest version of `ubi` using the link above.
### Setup Personal Access Token
In order to work, `ubi` requires a personal access token be provided via the `UBI_TOKEN` environment variable. If you have not already created a personal access token for your project, you can create one by going to the `Tokens` page for your project, and clicking the `Create Token` button:
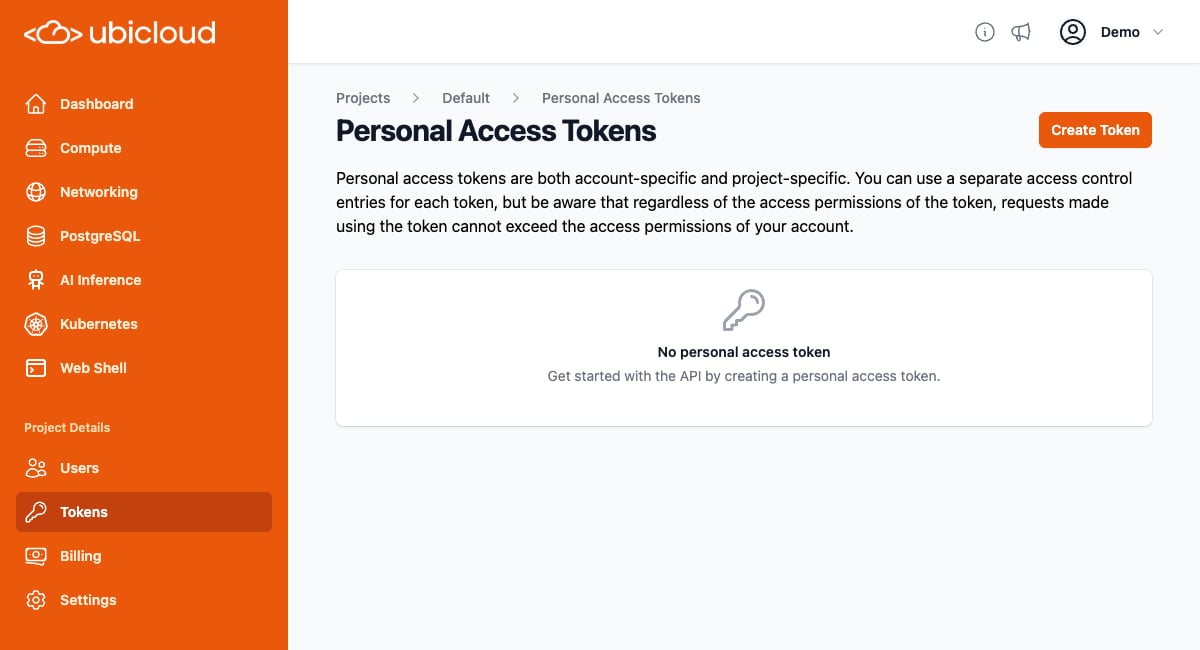 That will create a personal access token. Click on the clipboard icon under the token heading to copy the token to your clipboard:
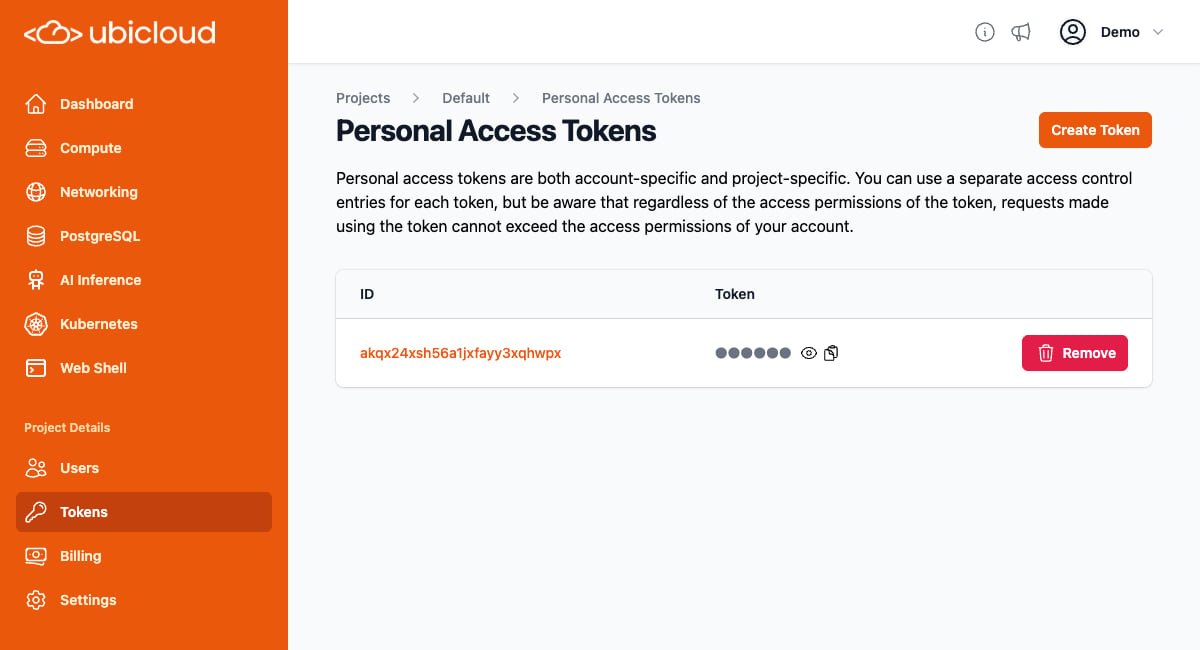 You can choose how you want to store this access token. As mentioned above, `ubi` requires it be provided via the `UBI_TOKEN` environment variable. If you have a password manager or other secure secret storage vault, you can store the token in there. If security is not your primary concern, you could store the access token in your shell startup files, so it is available for all programs.
As there a myriad number of ways that users may want to store the token, `ubi` does not provide integrations for specific token storage. You can use any storage method you want as long as the `UBI_TOKEN` environment variable is present when you execute the `ubi` program.
### Using `ubi`
If you execute `ubi` with no arguments, it displays an error, followed by the program usage
```
$ ubi
! No subcommand provided
CLI to interact with Ubicloud
Usage:
ubi command [command-options] ...
Examples:
ubi vm list # List virtual machines
ubi help vm # Get help for vm subcommand
Commands:
ai Manage AI features
fw Manage firewalls
help Get command help
kc Manage Kubernetes clusters
lb Manage load balancers
pg Manage PostgreSQL databases
ps Manage private subnets
version Display CLI program version
vm Manage virtual machines
```
`ubi` will prefix errors with `! ` and print errors to stderr instead of stdout. In this case, you get an error because you did not provide a subcommand when calling the program. `ubi` helpfully shows you the available subcommands in this case.
One of the subcommands is `help`. You can use `ubi help` to get usage information for various commands. For example, to see what is supported by the `ps` subcommand, you can run `ubi help ps`:
```
$ ubi help ps
Manage private subnets
Usage:
ubi ps command [...]
ubi ps (location/ps-name | ps-id) post-command [...]
Commands:
list List private subnets
Post Commands:
connect Connect a private subnet to another private subnet
create Create a private subnet
destroy Destroy a private subnet
disconnect Disconnect a private subnet from another private subnet
show Show details for a private subnet
```
This shows you there are two ways of using the `ps` subcommand. One way has subcommands that directly follow `ps`. The only supported subcommand in this case is `ps list`. So let's use `ubi help ps list`
```
$ ubi help ps list
List private subnets
Usage:
ubi ps list [options]
Options:
-f, --fields=fields show specific fields (comma separated)
-l, --location=location only show private subnets in given location
-N, --no-headers do not show headers
Allowed Option Values:
Fields: location name id net4 net6
```
This shows you the usage and options for the `ps list` command. You can then try running the `ubi ps list` command:
```
$ ubi ps list
location name id net4 net6
eu-central-h1 default-eu-central-h1 psaw09mq9ea21pc5d30b5x1t16 172.31.34.64/26 fd9e:2db6:b05:bf0c::/64
```
You can get help for the `help` subcommand by asking for it:
```
$ ubi help help
Get command help
Usage:
ubi help [options] [command [subcommand]]
Options:
-r, --recursive also show documentation for all subcommands of command
-u, --usage only show usage
```
This describes the `-r`/`--recursive` and `-u`/`--usage` options. It's useful to combine those together to get a recursive display of usage for subcommands:
```
$ ubi help -ru
ubi command [command-options] ...
ubi ai [command] ...
ubi ai api-key [command] ...
ubi ai api-key api-key-id [post-command] ...
ubi ai api-key create
ubi ai api-key list [options]
ubi ai api-key api-key-id destroy [options]
ubi ai api-key api-key-id show
ubi fw command [...]
ubi fw (location/fw-name | fw-id) post-command [...]
ubi fw list [options]
ubi fw (location/fw-name | fw-id) add-rule [options] cidr
ubi fw (location/fw-name | fw-id) attach-subnet ps-id
ubi fw location/fw-name create [options]
ubi fw (location/fw-name | fw-id) delete-rule rule-id
ubi fw (location/fw-name | fw-id) destroy [options]
ubi fw (location/fw-name | fw-id) detach-subnet ps-id
ubi fw (location/fw-name | fw-id) show [options]
ubi help [options] [command [subcommand]]
ubi kc command [...]
ubi kc (location/kc-name | kc-id) post-command [...]
ubi kc list [options]
ubi kc location/kc-name create [options]
ubi kc (location/kc-name | kc-id) destroy [options]
ubi kc (location/kc-name | kc-id) kubeconfig
ubi kc (location/kc-name | kc-id) show [options]
ubi lb command [...]
ubi lb (location/lb-name | lb-id) post-command [...]
ubi lb list [options]
ubi lb (location/lb-name | lb-id) attach-vm vm-id
ubi lb location/lb-name create [options] ps-id src-port dst-port
ubi lb (location/lb-name | lb-id) destroy [options]
ubi lb (location/lb-name | lb-id) detach-vm vm-id
ubi lb (location/lb-name | lb-id) show [options]
ubi lb (location/lb-name | lb-id) update algorithm src-port dst-port health-check-endpoint [vm-id [...]]
ubi pg command [...]
ubi pg (location/pg-name | pg-id) [post-options] post-command [...]
ubi pg list [options]
ubi pg (location/pg-name | pg-id) add-firewall-rule cidr
ubi pg (location/pg-name | pg-id) add-metric-destination username password url
ubi pg location/pg-name create [options]
ubi pg (location/pg-name | pg-id) delete-firewall-rule rule-id
ubi pg (location/pg-name | pg-id) delete-metric-destination md-id
ubi pg (location/pg-name | pg-id) destroy [options]
ubi pg (location/pg-name | pg-id) [options] pg_dump [pg_dump-options]
ubi pg (location/pg-name | pg-id) [options] pg_dumpall [pg_dumpall-options]
ubi pg (location/pg-name | pg-id) [options] psql [psql-options]
ubi pg (location/pg-name | pg-id) reset-superuser-password new-password
ubi pg (location/pg-name | pg-id) restart
ubi pg (location/pg-name | pg-id) restore new-db-name restore-time
ubi pg (location/pg-name | pg-id) show [options]
ubi ps command [...]
ubi ps (location/ps-name | ps-id) post-command [...]
ubi ps list [options]
ubi ps (location/ps-name | ps-id) connect ps-id
ubi ps location/ps-name create [options]
ubi ps (location/ps-name | ps-id) destroy [options]
ubi ps (location/ps-name | ps-id) disconnect ps-id
ubi ps (location/ps-name | ps-id) show [options]
ubi version
ubi vm command [...]
ubi vm (location/vm-name | vm-id) [post-options] post-command [...]
ubi vm list [options]
ubi vm location/vm-name create [options] public_key
ubi vm (location/vm-name | vm-id) destroy [options]
ubi vm (location/vm-name | vm-id) restart
ubi vm (location/vm-name | vm-id) [options] scp [scp-options] (local-path :remote-path | :remote-path local-path)
ubi vm (location/vm-name | vm-id) [options] sftp [sftp-options]
ubi vm (location/vm-name | vm-id) show [options]
ubi vm (location/vm-name | vm-id) [options] ssh [ssh-options --] [remote-cmd [remote-cmd-arg ...]]
```
Some command types are present for all objects:
* `list`: display a subset of information for multiple objects of the same type
* `show`: display detailed information about a specific object
* `create`: create an object
* `destroy`: destroy an object (asks for confirmation by default before destruction)
Other commands are object-specific.
### Running Programs
There are currently 6 commands that execute programs:
* `vm ssh`: connects to a virtual machine via `ssh`
* `vm sftp`: connects to a virtual machine via `sftp`
* `vm scp`: copy file/directory from the local computer to a virtual machine or from a virtual machine to the local computer via `scp`
* `pg psql`: connect to a PostgreSQL database via `psql`
* `pg pg_dump`: dump a single PostgreSQL database using `pg_dump`
* `pg pg_dumpall`: dump an entire PostgreSQL database cluster using `pg_dumpall`
If you want to configure which program is executed, set the appropriate environment variable (e.g. `UBI_SSH` for `ssh`, `UBI_SFTP` for `sftp`).
### Command Line Interface Architecture
The above instructions should be all you need in order to use `ubi`. However, if you are interested in how `ubi` works and why it works the way it does, you can read this section.
`ubi` is different than many other similar command line programs in that it does no parsing of arguments (`argv`) it is called with. It just takes the arguments and sends them to Ubicloud. Ubicloud parses the arguments, and determines what action to take, and returns the output to `ubi`, which displays the output for the user (or in some cases, runs a supported program or asks for comfirmation). At Ubicloud, we call this a Thin CLIent approach to command line interface design.
The advantage of implementing `ubi` this way is that Ubicloud can improve the command line interface at any time to add new features, and have users of `ubi` automatically benefit from those features without having to update their program. With traditional command line programs, that do their own argument parsing, adding new features requires that each machine running the program be updated to use those features. By having `ubi` pass the arguments to Ubicloud without parsing them, Ubicloud brings the advantages of web distribution to the command line, so that all users can immediately benefit from new features.
There are a couple disadvantages of implementing `ubi` this way:
* All commands require contacting the server, so even getting `help` output takes some time.
* It requires extra care in regards to security when executing programs, so that a rogue server cannot result in a remote code execution vulnerability on machines running `ubi`.
To mitigate potential security issues with the Thin CLIent approach, `ubi` does the following checks:
* Only the 6 commands explicitly whitelisted can be executed.
* A command cannot be executed unless it appears in the `argv` passed to `ubi`.
* The arguments for the command to execute:
* Must include `--` to separate arguments from options (except for `pg_dumpall`, which does not support this).
* Must only include one new argument not in the `argv` passed to `ubi`.
* The new argument must come after `--` (for non-`pg_dumpall`) or must start with `-d` (for `pg_dumpall`)
In other words, Ubicloud's command line processing can rearrange arguments, and add one new argument, but that argument should be an argument and not an option for the executed program.
You can choose how you want to store this access token. As mentioned above, `ubi` requires it be provided via the `UBI_TOKEN` environment variable. If you have a password manager or other secure secret storage vault, you can store the token in there. If security is not your primary concern, you could store the access token in your shell startup files, so it is available for all programs.
As there a myriad number of ways that users may want to store the token, `ubi` does not provide integrations for specific token storage. You can use any storage method you want as long as the `UBI_TOKEN` environment variable is present when you execute the `ubi` program.
### Using `ubi`
If you execute `ubi` with no arguments, it displays an error, followed by the program usage
```
$ ubi
! No subcommand provided
CLI to interact with Ubicloud
Usage:
ubi command [command-options] ...
Examples:
ubi vm list # List virtual machines
ubi help vm # Get help for vm subcommand
Commands:
ai Manage AI features
fw Manage firewalls
help Get command help
kc Manage Kubernetes clusters
lb Manage load balancers
pg Manage PostgreSQL databases
ps Manage private subnets
version Display CLI program version
vm Manage virtual machines
```
`ubi` will prefix errors with `! ` and print errors to stderr instead of stdout. In this case, you get an error because you did not provide a subcommand when calling the program. `ubi` helpfully shows you the available subcommands in this case.
One of the subcommands is `help`. You can use `ubi help` to get usage information for various commands. For example, to see what is supported by the `ps` subcommand, you can run `ubi help ps`:
```
$ ubi help ps
Manage private subnets
Usage:
ubi ps command [...]
ubi ps (location/ps-name | ps-id) post-command [...]
Commands:
list List private subnets
Post Commands:
connect Connect a private subnet to another private subnet
create Create a private subnet
destroy Destroy a private subnet
disconnect Disconnect a private subnet from another private subnet
show Show details for a private subnet
```
This shows you there are two ways of using the `ps` subcommand. One way has subcommands that directly follow `ps`. The only supported subcommand in this case is `ps list`. So let's use `ubi help ps list`
```
$ ubi help ps list
List private subnets
Usage:
ubi ps list [options]
Options:
-f, --fields=fields show specific fields (comma separated)
-l, --location=location only show private subnets in given location
-N, --no-headers do not show headers
Allowed Option Values:
Fields: location name id net4 net6
```
This shows you the usage and options for the `ps list` command. You can then try running the `ubi ps list` command:
```
$ ubi ps list
location name id net4 net6
eu-central-h1 default-eu-central-h1 psaw09mq9ea21pc5d30b5x1t16 172.31.34.64/26 fd9e:2db6:b05:bf0c::/64
```
You can get help for the `help` subcommand by asking for it:
```
$ ubi help help
Get command help
Usage:
ubi help [options] [command [subcommand]]
Options:
-r, --recursive also show documentation for all subcommands of command
-u, --usage only show usage
```
This describes the `-r`/`--recursive` and `-u`/`--usage` options. It's useful to combine those together to get a recursive display of usage for subcommands:
```
$ ubi help -ru
ubi command [command-options] ...
ubi ai [command] ...
ubi ai api-key [command] ...
ubi ai api-key api-key-id [post-command] ...
ubi ai api-key create
ubi ai api-key list [options]
ubi ai api-key api-key-id destroy [options]
ubi ai api-key api-key-id show
ubi fw command [...]
ubi fw (location/fw-name | fw-id) post-command [...]
ubi fw list [options]
ubi fw (location/fw-name | fw-id) add-rule [options] cidr
ubi fw (location/fw-name | fw-id) attach-subnet ps-id
ubi fw location/fw-name create [options]
ubi fw (location/fw-name | fw-id) delete-rule rule-id
ubi fw (location/fw-name | fw-id) destroy [options]
ubi fw (location/fw-name | fw-id) detach-subnet ps-id
ubi fw (location/fw-name | fw-id) show [options]
ubi help [options] [command [subcommand]]
ubi kc command [...]
ubi kc (location/kc-name | kc-id) post-command [...]
ubi kc list [options]
ubi kc location/kc-name create [options]
ubi kc (location/kc-name | kc-id) destroy [options]
ubi kc (location/kc-name | kc-id) kubeconfig
ubi kc (location/kc-name | kc-id) show [options]
ubi lb command [...]
ubi lb (location/lb-name | lb-id) post-command [...]
ubi lb list [options]
ubi lb (location/lb-name | lb-id) attach-vm vm-id
ubi lb location/lb-name create [options] ps-id src-port dst-port
ubi lb (location/lb-name | lb-id) destroy [options]
ubi lb (location/lb-name | lb-id) detach-vm vm-id
ubi lb (location/lb-name | lb-id) show [options]
ubi lb (location/lb-name | lb-id) update algorithm src-port dst-port health-check-endpoint [vm-id [...]]
ubi pg command [...]
ubi pg (location/pg-name | pg-id) [post-options] post-command [...]
ubi pg list [options]
ubi pg (location/pg-name | pg-id) add-firewall-rule cidr
ubi pg (location/pg-name | pg-id) add-metric-destination username password url
ubi pg location/pg-name create [options]
ubi pg (location/pg-name | pg-id) delete-firewall-rule rule-id
ubi pg (location/pg-name | pg-id) delete-metric-destination md-id
ubi pg (location/pg-name | pg-id) destroy [options]
ubi pg (location/pg-name | pg-id) [options] pg_dump [pg_dump-options]
ubi pg (location/pg-name | pg-id) [options] pg_dumpall [pg_dumpall-options]
ubi pg (location/pg-name | pg-id) [options] psql [psql-options]
ubi pg (location/pg-name | pg-id) reset-superuser-password new-password
ubi pg (location/pg-name | pg-id) restart
ubi pg (location/pg-name | pg-id) restore new-db-name restore-time
ubi pg (location/pg-name | pg-id) show [options]
ubi ps command [...]
ubi ps (location/ps-name | ps-id) post-command [...]
ubi ps list [options]
ubi ps (location/ps-name | ps-id) connect ps-id
ubi ps location/ps-name create [options]
ubi ps (location/ps-name | ps-id) destroy [options]
ubi ps (location/ps-name | ps-id) disconnect ps-id
ubi ps (location/ps-name | ps-id) show [options]
ubi version
ubi vm command [...]
ubi vm (location/vm-name | vm-id) [post-options] post-command [...]
ubi vm list [options]
ubi vm location/vm-name create [options] public_key
ubi vm (location/vm-name | vm-id) destroy [options]
ubi vm (location/vm-name | vm-id) restart
ubi vm (location/vm-name | vm-id) [options] scp [scp-options] (local-path :remote-path | :remote-path local-path)
ubi vm (location/vm-name | vm-id) [options] sftp [sftp-options]
ubi vm (location/vm-name | vm-id) show [options]
ubi vm (location/vm-name | vm-id) [options] ssh [ssh-options --] [remote-cmd [remote-cmd-arg ...]]
```
Some command types are present for all objects:
* `list`: display a subset of information for multiple objects of the same type
* `show`: display detailed information about a specific object
* `create`: create an object
* `destroy`: destroy an object (asks for confirmation by default before destruction)
Other commands are object-specific.
### Running Programs
There are currently 6 commands that execute programs:
* `vm ssh`: connects to a virtual machine via `ssh`
* `vm sftp`: connects to a virtual machine via `sftp`
* `vm scp`: copy file/directory from the local computer to a virtual machine or from a virtual machine to the local computer via `scp`
* `pg psql`: connect to a PostgreSQL database via `psql`
* `pg pg_dump`: dump a single PostgreSQL database using `pg_dump`
* `pg pg_dumpall`: dump an entire PostgreSQL database cluster using `pg_dumpall`
If you want to configure which program is executed, set the appropriate environment variable (e.g. `UBI_SSH` for `ssh`, `UBI_SFTP` for `sftp`).
### Command Line Interface Architecture
The above instructions should be all you need in order to use `ubi`. However, if you are interested in how `ubi` works and why it works the way it does, you can read this section.
`ubi` is different than many other similar command line programs in that it does no parsing of arguments (`argv`) it is called with. It just takes the arguments and sends them to Ubicloud. Ubicloud parses the arguments, and determines what action to take, and returns the output to `ubi`, which displays the output for the user (or in some cases, runs a supported program or asks for comfirmation). At Ubicloud, we call this a Thin CLIent approach to command line interface design.
The advantage of implementing `ubi` this way is that Ubicloud can improve the command line interface at any time to add new features, and have users of `ubi` automatically benefit from those features without having to update their program. With traditional command line programs, that do their own argument parsing, adding new features requires that each machine running the program be updated to use those features. By having `ubi` pass the arguments to Ubicloud without parsing them, Ubicloud brings the advantages of web distribution to the command line, so that all users can immediately benefit from new features.
There are a couple disadvantages of implementing `ubi` this way:
* All commands require contacting the server, so even getting `help` output takes some time.
* It requires extra care in regards to security when executing programs, so that a rogue server cannot result in a remote code execution vulnerability on machines running `ubi`.
To mitigate potential security issues with the Thin CLIent approach, `ubi` does the following checks:
* Only the 6 commands explicitly whitelisted can be executed.
* A command cannot be executed unless it appears in the `argv` passed to `ubi`.
* The arguments for the command to execute:
* Must include `--` to separate arguments from options (except for `pg_dumpall`, which does not support this).
* Must only include one new argument not in the `argv` passed to `ubi`.
* The new argument must come after `--` (for non-`pg_dumpall`) or must start with `-d` (for `pg_dumpall`)
In other words, Ubicloud's command line processing can rearrange arguments, and add one new argument, but that argument should be an argument and not an option for the executed program.